How to turn your PC into a Tennis court by using pygame [Pygameを利用してパスコンをテニスコートに変更させましょう]
Turn your PC into a Tennis Court [日本語版]
What if I told you that recreating the all-time classic game Pong might be significantly easier than you think? In this article I will show you a way of programming Pong on your own pc using Python. I will make use of the pygame library, which you can find more about on this link.
This article will be divided in the following chapters:
- Creating a Screen
- Creating the court, pads and ball
- Making the ball move
- Making the pads move
Before we start building our own screen, we have to initialize pygame module in our code first. So first things first by adding the command pygame.init() to our code we are able to execute all the nice functions pygame has to offer for us.
In order to create a screen/window with pygame we can make use of an in-built function which is called pygame.display.set_mode(). This function requires us to set the height as well as the width of the screen we are trying to implement. I set the the height of my screen (sheight) to 600 and the width (swidth) to 800.

After compiling the code you should be able to see a black window popping up, which serve as a canvas for our little Tennis game. You maybe also noticed that there is a While True: statement. please note that without those lines of code you would not be able to close the window by pressing the top-right x-button, which is mildly annoying. Further more as a loop function it allows us to define a recursive procedure within our code so that the code within this statement is run over and over again and doesn’t end after being executed just once.
2.) Creating the court, pads and ball
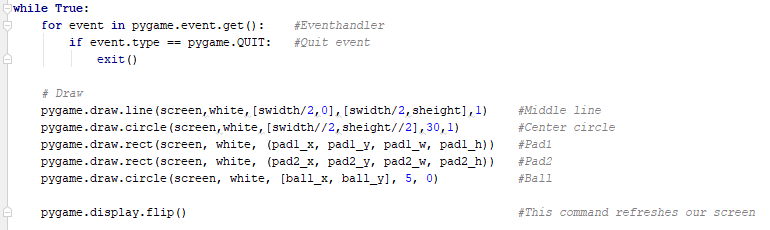
This chapter is dedicated to probably be the most fun thing about this project, which is actually adding different components to our screen which will enable us to play. Let’s start by turning our black boring screen into something that resembles a playing field by adding a middle line, center circle, paddles and a ball to it:
In order to do this we need to “draw” on our screen. Utilizing pygames drawing function allows us to do so. In combination with pygame.display.flip() which refreshes our screen constantly, we are able to draw, clear, draw, clear our screen continuously. This is extremly important when we are adding movement to our game later on.
The drawing functions look like this:
pygame.draw.line(screen, White, [swidth / 2, 0], [swidth / 2, sheight], 1)
pygame.draw.circle(screen, White, [swidth // 2, sheight // 2], 20, 1)
pygame.draw.rect(screen, White, (pad1_x, pad1_y, pad1_w, pad1_h))
pygame.draw.circle(screen, White, [ball_x, ball_y], 5, 0)
As you might notice they all require the same sort of input, which is
WHERE to draw on (Screen)
COLOR (White)
COORDINATES (Coordinates on our Screen)
Implemented in our game it should look a little like this:

3. Make the ball move
Now let’s create a function, that will make the ball move on our screen. This requires us to have some kind of collsion recognition mechanism as well as a reset mechanism that resets the position of the ball to the middle of the screen if it goes out of bounds. The code that does that for us looks like this:

Please note the implementation of pygame.time.Clock(). This function is required to control the framerate (FPS) of our game. This framerate is set by clock.tick(). The number in the brackets sets the number of frames that pass in one second. Therefore the lower this value the less fluent and llower the movement in the game becomes.
4. Make the pads move
In order to make Paddle 1 move we need to add a Keyhandler to our code. Making use of a keyhandler enables us to use our keyboard to steer our paddle. If we press up we want the paddle to go up until the upper bound of the screen and vice versa go down until the lower bound if we press down.
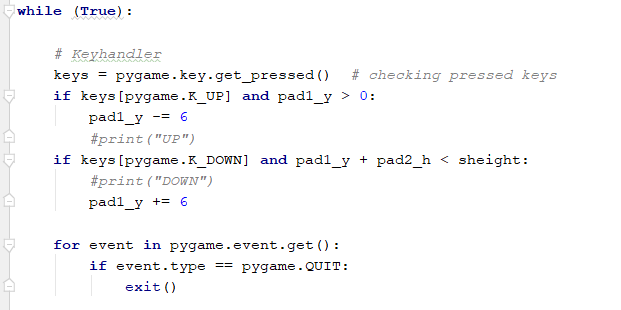
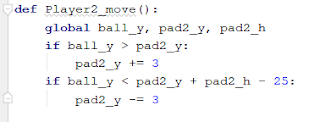
As illustrated in the screenshot a combination of two if conditions will do the trick for us. For the second paddle we can create a function that will make the paddle move on its own, allowing us to play against the computer. Probably the easiest way is to make the paddle move upward if the balls vertical position becomes bigger than the upper edge of paddle and the other way round, which transcribed in code should look a little something like this:
In order to make Paddle 1 move we need to add a Keyhandler to our code. Making use of a keyhandler enables us to use our keyboard to steer our paddle. If we press up we want the paddle to go up until the upper bound of the screen and vice versa go down until the lower bound if we press down.

As illustrated in the screenshot a combination of two if conditions will do the trick for us. For the second paddle we can create a function that will make the paddle move on its own, allowing us to play against the computer. Probably the easiest way is to make the paddle move upward if the balls vertical position becomes bigger than the upper edge of paddle and the other way round, which transcribed in code should look a little something like this:

And there you have it! I am sure there are a lot of ways how to improve my solution significantly so do not hesitate to let me hear about that. For those who will try to program that game yourself please enjoy the process.
The full code is available here:
https://github.com/arleckse/Pong.git
Alex
日本語版
Alex
パソコンをテニスコートに転換させましょう!
皆さんPong(ポン; Wikipediaの記事はこちらのリンクで見られます)というゲーム知っていますか。実はこのクラッシクのテニスゲームを自分のパソコンで作ることは思っていたほど難しくないかもしれません。この記事でコーディングを活かして、Pythonで皆さんと一緒にPongを作ってみたいと思います。そうしたら、PygameというLibraryを使いたいと思います。Pygame
について詳しい情報はこちらのリンクでご覧いただけます。
それではこの記事を下記に書いてあるとおり、4つの章に分別したいと思います:
- スクリーンを作りましょう
- コートとラケットとボールの設置
- ボールを動かせましょう!
- パッドを動かせましょう!
1.) スクリーンを作りましょう
スクリーンを初期化させる前、Pygame.displayモジュールを初期化させる必要があります。それではまずPygame.init()というコードを書いて、Pygameのファンクションを使用することを可能させましょう。そうしましたら、Pygame.displaz.set_mode()というファンクションを使ってスクリーンを作りましう。スクリーンを作るのにはスクリーンの縦横比を設定しないといけません。私はこちらの例で縦(sheight)を600にして,横(swidth)を800にしました。

このコードを実行しましたら、黒い画面が出てくるはずです。この画面はテニスゲームのベースとなります。おそらくWhile True:というコードが気になっていると思います。While
True: とこの先に書いてあるコードがなければ、画面の右上にある赤いバツで画面を閉じることができなくなります。そうしないと結構めんどくさくなるので、必ず使ってください。あとはWhile True: は無限なループを表しています。それでループに入っているファンクションは画面を閉じるまで、繰り返されます。
2.) コートとラケットとボールの設置
こちらのプロジェクトで一番楽しい部分だと思われます。それはスクリーンに様々な構成要素を加えることです。今のところまでの単純なただの黒いスクリーンにハーフライン、センターサークル、ラケットとボールを描きましょう。
Pygame.drawファンクションとpygame.display.flip()ファンクションを利用して、スクリーンに構成要素を描いたり、スクリーン自体を更新させたりしましょう。スクリーンを更新させるのは、特にゲームの構成要素を動作させたら、大事になってきますが、とりあえず構成要素を描くことに集中しましょう。
下記のはPygame.drawファンクションとなります:
pygame.draw.line(screen,
White, [swidth / 2, 0], [swidth / 2,
sheight], 1)
pygame.draw.circle(screen, White, [swidth // 2, sheight // 2], 20, 1)
pygame.draw.rect(screen, White, (pad1_x, pad1_y, pad1_w, pad1_h))
pygame.draw.circle(screen, White, [ball_x, ball_y], 5, 0)
pygame.draw.circle(screen, White, [swidth // 2, sheight // 2], 20, 1)
pygame.draw.rect(screen, White, (pad1_x, pad1_y, pad1_w, pad1_h))
pygame.draw.circle(screen, White, [ball_x, ball_y], 5, 0)
皆さんはもう気が付いたと思いますが、Drawファンクションは微妙に違ったりします。しかし、Inputの共通点が3つあります。それは:
どちらに描くこと(screen)
構成要素の色付け(white/白)
X-Y座標 (swidth/2,
sheight/2, pad1_x, pad1_y, ball_x やball_y)
です。それぞれのPygame.drawファンクションをコードに起こしましたら、スクリーンは下記のスクリーンショットのようになっているはずです。


3.)
ボールを動かしましょう!
ボールを動かせるために自分でファンクションを作らないといけないです。ファンクションにはボールを動かす以外、壁かラケットにぶつかることを認識できるメカニズムとボールがコートを出たら、ボールの座標をスクリーンの真ん中に戻せるメカニズムが必要となります。これを下記のファンクションで起こすことができます。


ゲームに動作を加えたら、pygame.time.clock()ファンクションを使用しないといけません。Clock.tick()ファンクションを用いて、ゲームのフレームレートを左右できるようになります。()に入っている数字は一秒で映しているフレームを表しています。なので、この数字が高ければ、高いほどゲームが速く流れるようになります。
4.) ラケットを動かしましょう!
左側のラケットを動かすためにゲームにKeyhandlerを実現しないといけません。そうしましたら、キーボードの入力をゲームに活かして、入力によってラケットを動かすことができます。上矢印キーを押したら、ラケットがスクリーンの上端まで上がるように、そして、下矢印キーを押したら、下端まで下がるように設定しましょう。
スクリーンショットで見れるようにIf文に二つの状況を加えないといけません。一つ目はキーが押されているかどうかという状況です。そして、スクリーンの上下端に届いているかどうかを確認している状況です。
二つ目のラケットを動かすために別のファンクションを作ることが必要になります。ファンクションによってラケットがボールがラケットより高い位置にとんでしまったら、自動的に上に上がって、ラケットより低い位置にとんでしまったら、下がって行くはずです。この動きは下記のファンクションで実現させることができます:
以上説明したコードを組み合わせたら、単純なゲームは完成されているはずです。改善させることがいっぱいあると思いますので、もし何か提案できることがあれば、教えてもらったら嬉しく思います。そして、自分でゲームを作ろと思っている方々がいれば、完成だれたコードは下記で見られます:
https://github.com/arleckse/Pong.git
https://github.com/arleckse/Pong.git
アレックス
Kommentare
Kommentar veröffentlichen